Neil the 2nd
Member

|
This is thread 2 of mine and Daykeems teaching the wonders of GIMP
Heres the link to our last thread
Alrighty im going to post a few Tuts here and also u can reqest some gimp tuts or ask any questions
so ask away
NT2's section
TUTS:
quote:
Blend Tut:
1. create ure sig
2. dont anchor ure render
3. select eraser
4. select opacity to 20%-25% (how ever much u want it blended
5. select the largest circle brush
6. go over the whole pic without relesing button
Done
quote:
Weird creature tut
1.open gimp
2. select ure size with a transparent bg
3 select the draw eclipse tool
4 click and drag mouse buton until right size
5. fill with whatever colours u want
6. do two side ways eclipses for eyes near top
7. use the circle brush any size u want and any colour and click where u want ure eyes
8. with same brush draw eyebrown just above head in any position (OPTIONAL)
9. draw mouth with same brush any shape (optional)
10 put text below (optional)
DONE
i know its not the best of tuts but meh
RESULT: 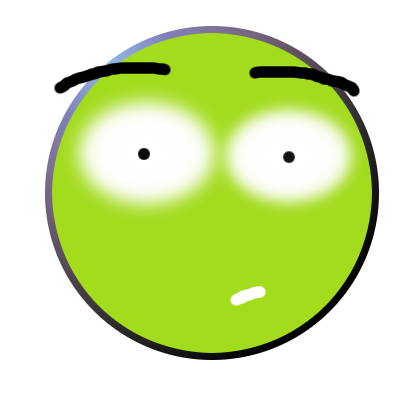
quote:
Border tut:
1.create ure sig 4 pixels each side smaller then usual
2. click script-fu
3. highlight decor
4. click add border
5. best size for the x and y axis is 2 pixels
6. choose ure border colour by clicking on the colour then click on ure new one
7. click OK and wait
8. u will notice ure sigs gotten 4 pixels vertical and horizontal bigger
DONE
quote:
Deleting the black bg on a render
1. paste ure render as it was
2. if ure bg of ure sig (not render) is a ready made pattern (in the pattern section) just bucket fill the black bg of the render with the same pattern
~~~~~~~~~~~~~~~~~~~~If Not a pattern~~~~~~~~~~~~~~~~~~~~~
if its not a pattern do the following
1. select the eraser
2. set opacity to 100%
3.go around ure render (once uve pasted it , that saves time)
done
quote:
Kool Glowing font:
1. dont open anything exept gimp
2. in the gimps tool bar goto Xtns > Script fu >logos > glowing hot (there is many other kool things there)
3. a window will pop up choose your font and size size 25 is good
4. click ok
5. it will come up in an orangy colour
6. if you wish to change colour of it goto layer > colours > colourise
7. move the bars to find your perfect colour
8. click ok
9. copy and paste into your current work
10 YOUR DONE
Daykeem2's Section
quote:
GIMP download tut
1) go to www.GIMP.com, click the picture and you will see a menue bar on the left side of the screen.
2) depending on what kind of computer you have (windows or mac) click one of the option below the menuse that says GIMP for Windows or GIMP for MacOSX (most likly GIMP for windows)
3)one you have click and and have gone into another window you will see a link near the top of the page that says "Automated Installer," click that.
4) now you should be in a page where the back ground is white and red. you will also see another menue bar on the left side of the screen. on the menue it will say download. click that.
5) now your in another window. there should be two downloads called "GTK + 2 for Windows (Version 2.6.8)" and "The Gimp for Windows (version 2.2.8)." in order to succesfully complete the download you must install the GTK + 2 first no matter what or the whole prosess would be messed up.
6) now after you have clicked the download botton for GTK +2 it will take you to one last Window. if your lucky, a winzip window will pop up and the set up wll be in there but if it dose not you will have to scroll down the window (in the location section) and look for "New York, New York." once you have found that you will see a white paper directly to the right of it with two red arrows pointing at the white paper. click that then wait a few seconds and the winzip window should pop up.
7) now complete the GTK + 2 set up.
NOTE: once the setup is complete its not suppose to be seen so dont worry when your finished the setup that you cant see an icon or something on your desktop.
8) now this is the real download. go back to the GIMP download window and download the second link that says "The Gimp for Windows (version 2.2.8)." it will bring you back to the same window with the location New York New York and so fourth so just do what i said before.
9) ok the download is now complete now go through that setup and put an icon on your desktop. your finished! start GIMPing!
quote:
Font Instuctions:
alright, first you must get your font. go to www.dafont.com to get some of the best. when you click the download botton a winzip window should pop up (thats if you have winzip. if you dont a window still should pop up). when the window pops up click the "start botton" on your task bar then click the botton "Run." once you have done that, a mini window should pop up and you should be able to write text in a small white box. in that box type in "fonts" and a the mini window will go away. wait a moment and another window should pop up called "fonts" with all your fonts in there. now, open the window with the downloaded fonts and drag them into the fonts window. next, close the fonts window and the window where the downloaded fonts are and click your main gimp window. click File>> Diolog and big list of items should show up. scroll down and look for "fonts". click it and another window should pop up. in the window there should be a small "x" and an "arrow" beside it with the point faceing to the left. click the "arrow" and another small menue will show up. on the top of the menue it should say "fonts menue" go over it with your mouse and it should say "rescan font list." click that and your done! click the "T" on your main GIMP window and look for your font. it should be in there some where (to make it easyer its in alphabetical order so it wont be that hard to find)
NOTE: some font files may come with more than one font. install them all any way.
quote:
quote:
Brushes Instuctions:
Alright. in order to add brushes to your GIMP you must first do this....
go into "My Computer and follow these instuctions:
C:\Program Files\GIMP-2.0\share\gimp\(the version you have)\brushes
once you have gotten into your brushes folder minimize it for now because its not that important at the moment. go to the site where you download the brushes (in the front page of this topic on the bottom of the first post, there will be a link to a brushes site for the GIMP program). download the brush and a winzip folder will pop up (thats if you have winzip. if you dont a window should still pop up). Useualy there should be more than 5 brushes in the downloaded file but if there isnt thats ok. now, open up your brushes window (the one you minimized). once you have done that, hightlight the brushes in the downloaded folder a drag them into your GIMP brushes folder. ones they have all been copyed. close the file with the downloaded brushes and the folder with your GIMP brushes because you dont need them any more. next, go into your main gimp window and click File>> Diologs and drop menue will appear. scroll down and look for brushes. click it and another small window will pop up with all of your brushes inside of it. on the top right of the window there should be an "x" and an "arrow" with the point facing the left of the screen. click the "arrow" and another drop menue will appear. on the top of that menue it should say "Brushes Menue." put your mouse over it and one more drop menue will appear. on the bottom of that drop menue it will say "Refresh Brushes." click that and and wait a while. you will know when the refresh has been complete. now your done! close that small window and go into your main gimp window. click the brush with the black paint on it stroking a piece of paper and look for your brushes. they should be in there some where. (to make it easyer, the designer of gimp made it in alphabetical order so it will be easyer to find the brushes. but thats only if you know the name of the brush you downloaded :P
quote:
Shiny BG's
Alright so you want a nice shiny BG to go with your render huh? then follow these instuctions:
Filters > Renders > Clouds > Plasma
set the turbulence all the way to 7.0 and press ok
Layers > colors > Desaturate
this will make all the bright colors turn black and white.
start to brush the Desaturated layer. i brushed it with a brush called the "Gimp Brush"
make sure when your brushing that its not to dark or the effect wont work as good
after you have finished brushing and it fits your liking duplicate the layer and set a defult gaussian blur on it (5.0). the more blur you set, the shinyer it is. now set the gaussian blurred layer mode to "Lighten Only" then merge it down with the first layer. your should come out with a beautiful shiny effect. all thats left to do it add colour and it will look even better. my image below is a perfect example of a shiny BG
http://img328.imageshack.us/img328/8364/dothacksign4if.png
Text Blending Tut:
Any Tut coming to u from your gal Daykeem...
in this tut you will learn how to blend your text into your render, background or what ever your planning to blend your text in.
before i biegin, i owuld advise that you dont use theis tut with very colourful enviornment. or course it can be colourful but not something with 57 completly different colour mixed together.
there are two parts to this tut; the detailed section and the non detailed. the non detailed is there for you to get through the tut nice and fast while the detailed is oposite. well, now i start...
quote:
Detailed:
1)Open up your gimp and created an image window. do what ever you need to do then add your text (i would advise a big fat text so you can see the results better but any size is ok).
2)Make sure that the text colour is white, any other colour wont work.
3)Press CRTL-L and the layer box should apear some there. in that box you should see your text. right click it then scroll down to the bottom of the menue and click Alpha to Selection.
4)By now, the (as i like to call them) marching ants should be circleing your text. this is called a selection. press CTRL-I to invert the selection. now the text and the whole image window outline should have a selection/marching ants around it.
5)Add drop shadow at this point: Script-Fu>> Shadow>> Drop Shadow. make the 'Y' and the 'X' 2, make the 'Blur Radious' 5, keep the colour black and uncheck 'Alow Resizing'. i would suggested expanding those attributes if you have text over size 70 and up. make sure blur radious is always bigger than Y and X and Y and X are same numbers.
6)Add another drop shadow andthis time change 'Y' and 'X' to 1, make 'Blur Radious' 0, make the drop shadow colour white and keep 'Alow Resizeing' uncheecked.
7)By this point you should have an amount of 3 layers. the White & Black drop shadows and the text layer. Merge ONLY THESE layers together
8)Just to make sure, on the image window click Select>> None. if you cant click none then dont worry about it.
9)On the merged layer right click it, go to the bottom of the menue and select Alpha to Selection. the whole text should now be surrounded by a selection/marching ants. now lets add a brevel: Script-Fu>> Decor>> Add Bevel and keep it at defult 5. uncheeck Work on Copy.
10)Now all thats left to do is add drop shadow agian: Script-Fu>> Shadow>> Drop Shadow and reset it so that the 'Y' is 2 and the 'X' is 2 also. change the Blurr radious so that its on five and change the colour to black. hit ok.
11)All thats left to do iss merge the text down on the drop shadow. set the text mode to either Value, Burn, Dodge, Soft Light or Overlay (i always go for Value). you can now move the text any where you want on ur image.
12)to make it stand out more i would suggect duplicting the text a number of times then merging them down. keep doing that untill you get the effect that you like.
13)Your DONE!
quote:
None Detailed:
1)Open up your gimp and created an image window. do what ever you need to do then add your text (i would advise a big fat text so you can see the results better but any size is ok).
2)Make sure that the text colour is white, any other colour wont work.
3)Press CRTL-L and the layer box should apear some there. in that box you should see your text. right click it then scroll down to the bottom of the menue and click Alpha to Selection.
4)By now, the (as i like to call them) marching ants should be circleing your text. this is called a selection. press CTRL-I to invert the selection. now the text and the whole image window outline should have a selection/marching ants around it.
5)Add drop shadow at this point: Script-Fu>> Shadow>> Drop Shadow. make the 'Y' and the 'X' 2, make the 'Blur Radious' 5, keep the colour black and uncheck 'Alow Resizing'. i would suggested expanding those attributes if you have text over size 70 and up. make sure blur radious is always bigger than Y and X and Y and X are same numbers.
6)On the image window press CRTL-I agian and then add brevel: Script-Fu>> Decor>> Add Bevel. keep the defult 5 and uncheeck Work on Copy.
7)Add drop shadow agian: Script-Fu>> Shadow>> Drop Shadow and keep the same attributes. hit OK.
8) merge all drop shadow layers to the text. select either Value, Burn, Dodge, Soft Light or Overlay (i always go for Value) for the text mode. YOR DONE!
comments, complaints, advisory, grammer or spelling suggestions always welcome
Neils ideas for Good websites:
Link < GIMP brushes
^^ive set up the search part so its already on gimp brushes
http://www.gimptalk.com/ < tuts, brushes, plugins,gallerys etc
http://gug.sunsite.dk/ < pretty much same as ^^
=======================================================================================
comments would be nice an remember dont be scared to post i like doing tuts for people
< Message edited by Grafh -- 9/8/2007 15:33:51 >
|
 Printable Version
 Icon Legend
 New Messages
 No New Messages
 Hot Topic w/ New Messages
 Hot Topic w/o New Messages
 Locked w/ New Messages
 Locked w/o New Messages
 Post New Thread