LightningIsMyName
Member

|
Before we start, we need to define several stuff:
PathTool (aka PenTool) - A tool use to create paths. Picture
Point (aka Anchor) - self explanatory :D
Line (aka Segment) - a connection between 2 points (not more and not less then 2)
Control (aka Handle) - a special kind of point that controls the curve of a Line. From each point you have 2 controls - one for the line that ends at the point and one for the line that starts at the point.
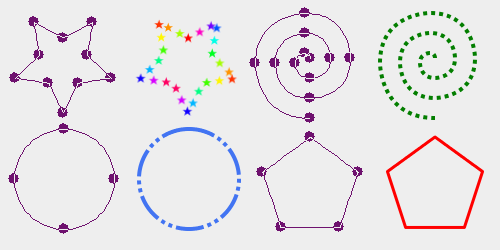
Stroke - one or more Points (Anchors) which are conected to each other. A closed stroke is a stroke where the first and last points are connected, and an Open Stroke is a stroke where the first and last points are not connected.
Path - a path is a collection of one or more strokes
Stroke 1: This shows a classical curved stroke
Stroke 2: This is a Polygonal stroke
Stroke 3: This is a Curved stroke - note that this is an Open stroke
PathTool Tutorial - Basics
Here is a basic demonstartion of using the Pentool/PathTool:
Now we need to explain 2 more things:
An Active Point is the last point (anchor) that you clicked on. A point can also become active if you drag a line that it's connected to (see explanations in the illustration below)
A control (handle) becomes visible only if the point it's part of is active.
in order to curve the line, while in "design" mode click on a line and drag it, notice that handles will come out of the dots - these are used to control the curve of the line. if you click on the handle and drag it you will be able to control the curve of the line more accurately.
by controling the handles you can have up to 2 curves per line so if you want more you will need more dots.
in the animation above I clicked on the line and dragged. I did it once next to each dot. that way i can control each one of the 2 possible curves.
Now let's try to be more practical: let's create something!

What happened?! why didn't the new point Connect to the old one?
The answer is simple: GIMP connects the new dot only when you selected one of the dots at the ends of a path, when a dot is selected it will look empty and a frame will appear in the place you should have a full dot.
In order to reconect this dot Ctrl+Click on one of the dots at the end to connect it. most of the times you won't need to do this since the dot will be connected automatically but it may happen if you have more then one dot selected or a dot which is no at the ends as your current selection.
we will now delete the newly created dot (by clicking the backspace or delete buttons on our keyboards) and connect our second dot to the first one.
PathTool Tutorial - Detailed Explanation
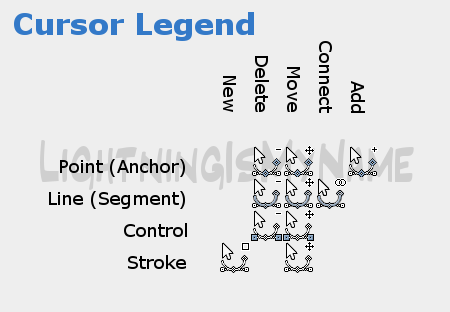 Note: Cursor pictures are updated for GIMP 2.4 Note: Cursor pictures are updated for GIMP 2.4
Shortcut Keys:
Design - Deafult
Edit - Ctrl
Move (Stroke) - Alt
Anchor Actions:
Deleting - Holding Shift on Edit (Ctrl) mode and clicking on it
Moving - Clicking on it and dragging in Design mode.
Adding at end - Design mode, active point should be open at one side
Adding at the middle of segment - Clicking on a segment in Edit (Ctrl) mode
Line (Segment) Actions:
Deleting - Holding Shift on Edit (Ctrl) mode and clicking on it
Moving - Clicking on it in and dragging in Design mode
Connecting - Clicking on a point in Edit (Ctrl) mode while both active point
and the point you are clicking on are unconnected at 1 or 2 sides
Control Actions:
Deleting - Holding Shift on Edit (Ctrl) mode and clicking on it
Moving (When Visible) - Clicking on it in and dragging in Design mode
Moving (When Invisible) - Clicking on it's Point (Anchor) and dragging in Edit
(Ctrl) mode
Stroke Actions:
New - Clicking anywhere in design mode when the active point is connected on
both sides or when there is more then one active point
Clicking Shift while in Design mode and then clicking anywhere you want
Move - Clicking on a stroke and then dragging while in Move (Alt) mode.
Note: The "Move Stroke" cursor is also used when using the move tool on
"Path". Don't get confused - when moving with the move tool the entire path
wil be moved - not just the specific stroke
PathTool Tutorial - Selections and Stroking
Selection - a selection from a path is basically the area inside the path. When the path is Open, it's treated like there is a straight line from the starting point to the end point.
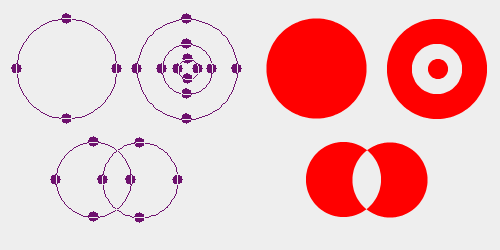
When we have an area covered by 2 paths (or any other even number) it won't be selected. Imagine a ring in real life, the edges of the ring are 2 circles when one is inside another and the area covered by both rings is the hole.
When we have an area covered by 1, 3 (or any other odd number) it will be selected. When we have an area covered only by one path it will be selected since this is how we defined the selection. When an area is covered by 2 (or any other even number) paths it will be a hole so when we have 3 (or any other odd number) it will be full again since we have 1 path inside a hole (the 2 paths cancel each other so we we have nothing in this area except for the one path and then this is the selection)
Stroking - stroking a path (to stroke a path) means to draw along it's lines.. In order to do this simply Click the path you want to stroke inside the paths dialog (Image window->Dialogs->Paths) and then go to the Image window->Edit->Stroke Path...
In the dialog that will pop you can select how to stroke the path, which tool to use it and you can set many other options - try playing with it.
Many thanks to the people who bumped this lately and showed interest in this - I saw this tutorial was important to people and that made me finally finish it.
< Message edited by LightningIsMyName -- 8/9/2010 19:58:23 >
|
 Printable Version
 Icon Legend
 New Messages
 No New Messages
 Hot Topic w/ New Messages
 Hot Topic w/o New Messages
 Locked w/ New Messages
 Locked w/o New Messages
 Post New Thread