siris99
Weapons Master

|
The last one was bumped out of sight and deleted, so here is a new one, all clean. Don't forget to post suggestions/ weapon tutorials you want to see here.
The number of weapon shops has been on the rise, so I figured it was time to create this guide/tutorial. 1. Coming up with an idea
A. Realism first decide if you want a realistic or fictional weapon. If realistic, then make sure it isn't too strangely shaped or balance to work. The pzycho sabres are a perfect example. The design is such that it could not be used in real battle. The tip would catch on other weapon, ripping it out of your hands. If you don't care (like the AQ style weapon makers) then go nuts
B. Picking the weapon type: Think of what kind of weapon you want. A sword is the most common weapon, but other weapon exist, such as maces, nagi-natas, axes, staffs, bows, and many more. Think of which one you feel like creating and pick that one to create.
C. Picking a weapon style: Yes, weapons have styles. They can be evil/sinister looking, holy looking (BOA) or even goofy and whatnot. Decide what style is right for your weapon. This will determine its element (if for AQ) and it color-scheme usually. Evil/sinister is usually dark, holy is usually light, and so on. The style is what makes a person think of a certain element when seeing your weapon. Hard points usually screams sinister
D. Color scheme: The element usually determines a weapon color scheme. A reddish weapon usually makes people think fire. A green or blue fire weapon throws people off. Elemental color-schemes Dark: dark colors, darker grays to black Light: light colors: whites to lighter grays, light yellow Fire: Reds, orange some grey or black Ice: light blues to whites Water: blues to dark blues Energy: yellows to SOME blue Earth: grays, browns, greens Wind: grays and whites. NOTE: Now you are ready to start creating your weapon. Doing the above is far easier then messing around and throwing random stuff together.
2. The tiny details: The small things usually make or break a weapon. Some key things to remember when making your weapon: SHADING: makes a weapon look better, and is fairly easy to do. Just get the color you used and make it slightly darker/lighter (usually 5-10 shades darker looks good) this makes it look more 3-d. Make all the shading go the same way. Going from light to dark on the blade but dark to light on the handle will look bad. OUTLINE: All AQ weapon have a black outline to them. Decide whether or not you want this on your weapon. Having a half outlined half not outlined weapon will look terrible. A good compromise is to use a darkened form of the color you are using as the outline (green blade with slightly darker green outline). This lets you outline and defines the weapon without being too distracting.
3. Naming: Make the name of the weapon match the weapon. Making a katana and calling it the axe of dreams or something like that is just plain stupid. Several things should go into choosing a name: the weapon type, style, and element. Taking a black, sinister katana and calling it the Mace of Huggy Sunshine is just wrong. Think evil words for dark, and so on. Make sure the weapon type is in the name. NOTE: if you start with a name conceiving the weapon is easier. Thinking of Pestilence dagger gives you 3 things: style, element (and therefore color-scheme), and weapon type. It will be a dark sinister dagger
Basic sword creation tutorial Making the blade: To start the basics, we will make two sword types stemming from the long sword. (No color added) Blade one and blade two (uncolored) to make blade one, follow the steps shown here as I explain them: step one: create two vertical lines spaced out so the length and width are proportional step two: add a tip and bottom line. The tip should be long, but not so long as to make the weapon look awkward. The bottom line is to enable you to color the weapon before adding a handle. step three: create a line running from the tip to the base to show the edge of the weapon. step four: add lines to define the point. This stops the weapon from looking flat and boring. Congrats, you have made the first blade! Blade two: to make blade two, follow the steps shown above as I explain them: step one: create two vertical lines that are slightly spaced out so the length and width are proportional. Too much or too little slant will look weird step two: add a tip and bottom line. The tip should be long, but not so long as to make the weapon look awkward. The bottom line is to enable you to color the weapon before adding a handle. step three: create a line running from the tip to the base to show the edge of the weapon. step four: add lines to define the point. This stops the weapon from looking flat and boring. Congrats, you have made the second blade!
Making the handle: *WoW*Handles are the easiest and most neglected part of a sword. I cannot count the number of times a disproportional or strange (too gaudy for blade or too plain for blade) handle has ruined a weapon. Simple blades have simple handles, and elegant blades have elegant handles. However you describe the blade is how you should describe the handle, and vice versa. Since the above blades are simple, I will show how to make a simple handle. Make a rectangle for the hilt, then a rectangle for the handle. Like so This may seem simplistic, but it can be easily messed up. The guard rectangle (between the blade and handle) should be long and thin. It is a placeholder until you add a custom guard. If you don't want to make a custom guard, then you may leave it (ex. long sword in AQ). The handle rectangle should never be wider than the blade or guard, or long enough to look unwieldy. A long blade has a long handle, end of discussion. The tiny details: shading a sword correctly: shading should be done like so: click or make the left side the same shade and the right side the same shade. Each area can be shaded from light to dark as well; this is a show of what should be the lightest and so on: 1 is the lightest, 4 is the darkest. Wrapping: The wrapping on a blade is something easily neglected that never should be. A good simplistic wrap is what I call the serpent, because it coils around the handle. It looks like so: 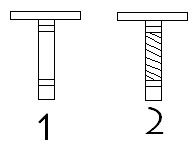 Make two rectangles on the handle. The top should be its own thickness away from the guard, while the bottom should be twice as far above the bottom of the handle. Place diagonal lines in equal length down the handle will give the blade a simple wrap look. The other wrap is called a layered or katana wrap. Katanas often had this style. Appearance: Make two rectangles on the handle. The top should be its own thickness away from the guard, while the bottom should be twice as far above the bottom of the handle. Place diagonal lines in equal length down the handle will give the blade a simple wrap look. The other wrap is called a layered or katana wrap. Katanas often had this style. Appearance: 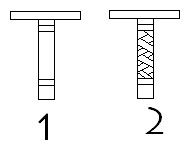 create widely spaced pairs of diagonal lines down between the rectangles. Then do the same on the other side, but do not go over the other set. Viola, you are done. Final picture: create widely spaced pairs of diagonal lines down between the rectangles. Then do the same on the other side, but do not go over the other set. Viola, you are done. Final picture: 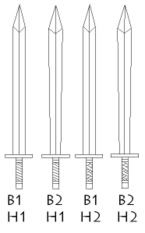 b1=blade 1 b2=blade 2 h1=handle1 h2=handle2 b1=blade 1 b2=blade 2 h1=handle1 h2=handle2
Elaborate Handle Creation Tutorial This is a tutorial for making a elaborate handle. Each picture shows what your handle should look like at each step. step 1 step 2 step 3 step 4 step 5 step 6 step 7/finished Step one: create a vertical box for the handle (part you hold). Create a horizontal half-arch. Like an f without the cross. Then copy it and turn it 180 degrees. Attach them and place on top of handle box. This is your guard. Step Two: Create an elongated diamond (top elongated) and attach at the bottom of the box as a pommel. Create curved lines attaching the top of the box to the guard. Step Three: Create an arch going from the bottom of the handle to the guard. This should be lighter than the other pieces we make in the next steps. Step Four: Create a half-arch from the middle of the previous arch to the other side of the guard. This should be the same color of the previous arch. Step Five: Just below the half-arch you just made, start another half-arch. This should be darker. Connect it with the top of the first arch you made (step 3). It should overlap the half-arch from step 4. Step Six: Create another half-arch from the base of the half-arch from step 5. The end of this half-arch should blend with the arch from step 3. Step Seven: Make a half-arch on the right side of the handle. Connect this to the top of the half-arch from Step 4. It should look like the half-arches from steps 5 & 6 blend into this arch from behind the box. Finished: Add a skinny blade to the top (this adds to the elegance of the handle). And Viola! You are done!
Simple sinister guard picture of steps step one: make a semi-arch. Step two: copy the semi-arch and flip it horizontally. Step three: Connect the two semi-arches with another arched line. Step four: Copy the image and flip it vertically. Attach them together. *WoW* Arches that connect in points make whatever you draw evil looking
Spirit Tomahawk creation (intermediate) *NOTE* this is more advanced than the other tutorials. As such, the steps are not as in-depth. Good luck, and let me see your finished art http://i12.photobucket.com/albums/a244/siris99/spirittomahawkfin.jpg
Sterling sword creation tutorial (intermediate) Image to go along with steps: click (for best results, enlarge image) 1. Create a vertical line 2. Using two straight lines, make a large hook 3. Add the underside of the hook and a -semi vertical line (the outside of the blade) 4. Add a smaller hook and close the lines up 5. Copy your image, paste it, and reflect that image horizontally. Place them together, and viola! The blade is done. 6. Add a basic handle 7. Create a Y shape using two more hooks. This should overlap the blade's hooks. 8. Add a grip wrap. 9. Using two more hooks, create a pommel 10. Add a tassel using two curved lines 11. Note: all hooks made using two straight lines.
Beam sword Tut (MS PAINT) as the title says, these are directions for doing it as it was originally created: in ms paint. I know some people hate Paint/are intimidated by it, but it is an easy program to pick up. click to see That is basic, feel free to vary your handles like I did here
Gun Tutorial Gun Tutorial: click for gun tutorial Tutorial for a generic shotgun piece. All instructions are on image, enjoy.
Emerald Fate Emerald Fate: click for tutorial Tutorial for a new weapon I made titles Emerald fate. This one is hosted on Deviantart because photobucket was distorting the image.
Tuner Blade Tuner Blade: click for tutorial Tutorial for the Tuner Blade, a new weapon I made. It is basic in design, but great for shading practice. Plus, it mods easily. See? Modified Tuner Blade.
Yea, you probably think I am nuts. Who draws stuff on paper then convert it to digital when it is easier to go digital in the first place? I will tell you why: because that extra step adds gives you an extra chance to refine and perfect your artwork. Many hand-drawn artists know what I am talking about, and probably agree that a sketchbook is a good idea. Let me break it down for you guys a little more clearly though. ---------------------------------------- I The Notebook: Idea book 1) Refinement and conception of ideas. Having a notebook to jot down or plan out ideas is never a bad thing. You need proof? I conceived the idea for this guide (of sorts) right before I was about to fall asleep. Normally, those ideas are great and lost due to the fact that they aren't remembered. However, with a notebook, this isn't a problem. I jotted down the idea and boom! This thread is born. Planning out threads you wish to make is a great function of a notebook. Normal threads were you wish to simply ask for help or state a simple opinion is not something that generally needs planning. However, well-thought out posts like: guides, tutorials, and generally anything meaningful will require some planning. Perfecting what you wish to say may take time, but it gives you the chance to show people that you are a competent and intelligent forumite. Having your ideas down on hardcopy gives you the chance to see your idea and critique it before you make a fool of yourself with a shoddy idea. Great things take effort, and having a place to prune your ideas is definitely and effort worth taking.
Proofs that a notebook is a good thing: This thread wouldn't exist without it. Leonardo Da Vinci. The great inventor and artist had notebooks (of sorts) for all of his ideas. How important were they? His concepts and scientific genius wouldn't be noted for future generations if they didn't exist. They are so valuable that Bill Gates paid nearly 30 million dollars to buy one. Da Vinci's notebooks were centuries ahead of their time. It was written proof that Da Vinci predicted things like submarines. His notebooks captured his genius, as should yours. II The Notebook: Sketchbook Readiness for Ideas Having perused many art books, the best advice was that for a sketchbook. As one author put it: [paraphrase] When inspiration strikes, the drawing must be sketched, lest it be lost forever. Drawing it on a napkin does this, but in a sketchbook lays the chance to completely capture your vision. [/paraphrase] ;) There is no feeling worse for an artist than to have inspiration and to have lost it. You never risk losing art when you keep a sketchbook around. Pruning/ fertilization of artwork it is far easier to correct your artwork on paper then it is to load a program and mess with it there. In a sketchbook lies the chance to create new drafts of your artwork with greater ease then on your computer.
Submitted tips: ShadowWrath: listening to geometry classes in school can reveal to be quite useful for certain designs when creating blades n' stuff ... de
The Basics of Paint. This should help anybody who wishes to become good at paint.  The curved line tool. 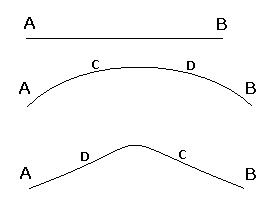
A=where you started the curved line
B= where you ended the curved line
c= first click to curve the line
d=second and final click to curve the line
Notice what happens if d occurs closer to A then c
Q&A When questions are asked after this first post I will add them here with my answer.
Q: Do I always have to follow these steps?
A: This is a guide to get you started in weapon making. Once you know what you are doing, things like color-schemes can go away
More tutorials for different weapons are soon to come! Let me see your attempts, this is actually quite easy once you get the hang of it! key: *WoW* means words of wisdom
< Message edited by siris99 -- 9/2/2012 21:50:44 >
|
 Printable Version
 Icon Legend
 New Messages
 No New Messages
 Hot Topic w/ New Messages
 Hot Topic w/o New Messages
 Locked w/ New Messages
 Locked w/o New Messages
 Post New Thread